Articles20 min read

Process Art Curriculum for Preschoolers: An Age-by-Age Framework with a 12-Month Scope & Sequence

A full-year process art curriculum for preschool through early elementary — built on an age-by-age progression of skills and materials, with a 12-month scope and sequence, sustainable setup, an honest assessment frame, and the parent scripts that turn a tub of paint into a documented year of development.

Watercolor illustration showing process art in action across 4 age groups: toddler with finger paints (18-24 months), preschooler with chunky brush at easel (3-4 years), pre-K child using tripod grip crayon (4-5 years), early elementary showing layered watercolor technique (5-7 years). Shows developmental progression in child-led exploration.

Process Art Curriculum for Preschoolers: An Age-by-Age Framework with a 12-Month Scope & Sequence

My first process art program lasted eight days. I had bought twelve colors of tempera, four kinds of paper, sponges, stamps, and a set of stencils, and I set it all out at once on a Monday morning. By Wednesday the children had mixed every color into the same brown, the stencils were torn, and three children had decided the art table was "boring." I had given them everything, which turned out to be the same as giving them nothing — there was no constraint to push against and no skill building week to week. I had built an activities bin, not a curriculum.

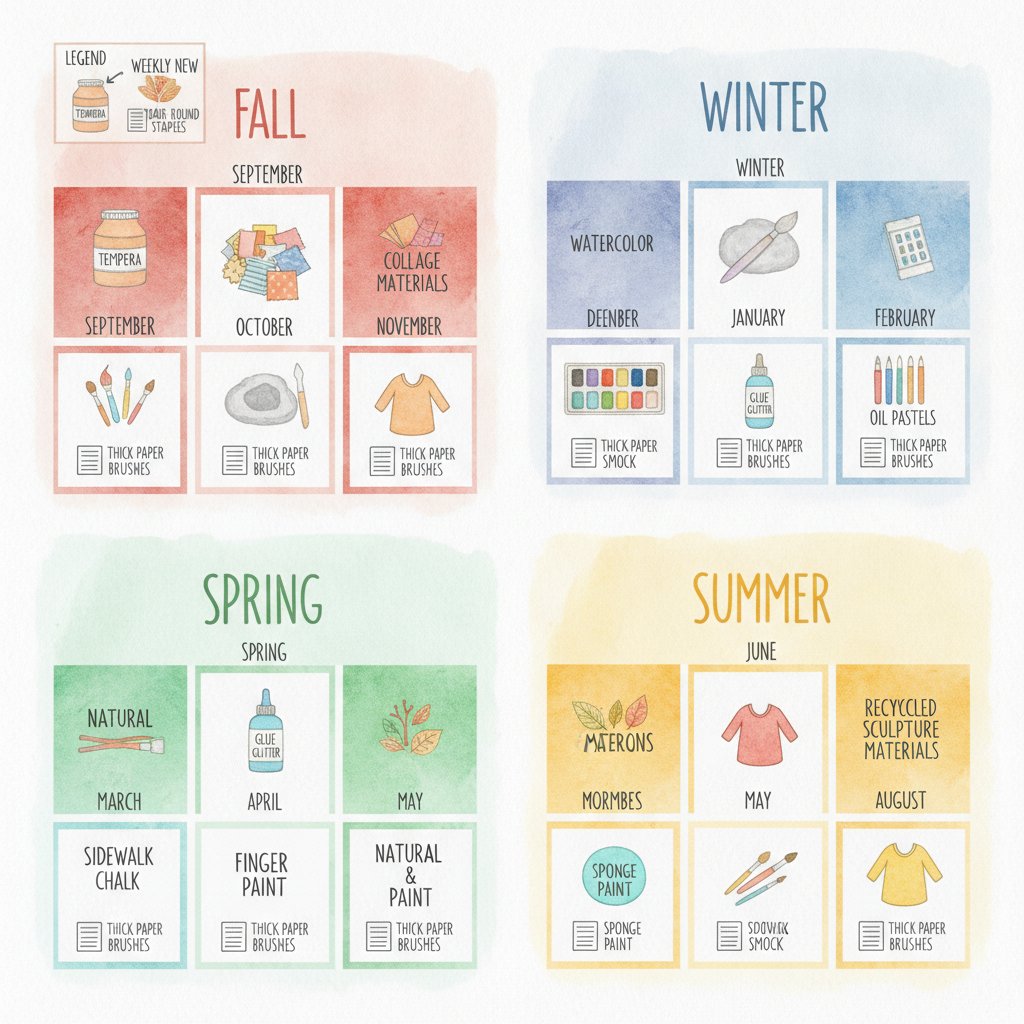
The version that lasted the year was the opposite, and it is the version I have rebuilt in every classroom since. One new material a week, sitting next to the same three staples, sequenced to the developing hand, with a chart on the wall showing which skills we had already explored. Engagement at the table went from an average of four minutes per child to fourteen, measured over a two-week observation, and the art that came out of it was genuinely the children's own. That is the whole case for treating process art as a curriculum rather than a craft rotation: it builds attention, fine motor control, and creative confidence — but only when it is sequenced like one.

This guide is the structured curriculum I wish I had been handed. You will find what a process art curriculum actually is (and is not), the developmental logic behind an age-by-age progression, a twelve-month scope and sequence you can run as a full school year, the setup and materials that make it sustainable, an honest assessment framework, and the parent scripts that stop the "why does it look like nothing" conversation before it starts. If you came here looking for process art activities for preschoolers rather than the full curriculum, the 12-month plan below still names every activity — and the curriculum framing is what turns those activities into a year of development.

What a Process Art Curriculum Actually Is

A process art curriculum is not a folder of activities. It is a sequenced plan in which the materials, the skills they demand, and the order they appear are all chosen to match a child's developmental stage and to build, deliberately, across a year. The National Association for the Education of Young Children (NAEYC) has long held, in its position statements on developmentally appropriate practice, that children learn best through self-directed, hands-on experience with open-ended materials — and that the adult's role is to curate the environment and the sequence, not to direct the product. A curriculum is how you make that position operational, Monday to Monday, for ten months.

The distinction that matters is between three things that all get called "art" in an early-childhood room:

  • Product art (craft). The child assembles a pre-designed result — the cotton-ball snowman, the handprint turkey. The value is the finished object. Useful occasionally; overused, it teaches children that art is a test of whether their work matches the model.
  • Free art (open access). Materials are available with no plan. The child explores freely. Valuable, but on its own it does not build skills in a sequence, because there is no sequence.
  • Process art curriculum. Open-ended materials, child-led making, but sequenced to a developmental progression and supported by a curated environment and a documentation frame. This is the middle path, and it is what this guide builds.

Three principles separate a curriculum from a bin of supplies, and every choice in the twelve-month plan below follows from them:

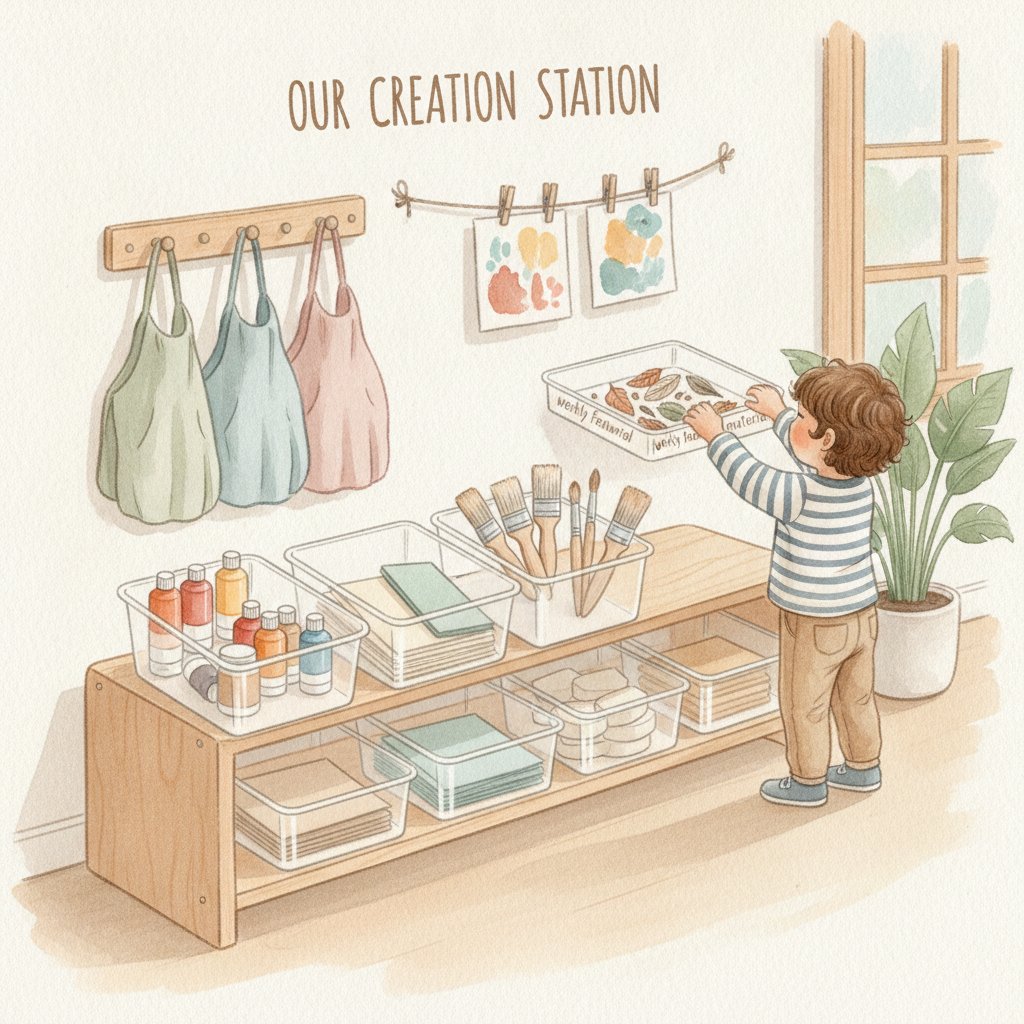
  • The environment is the lesson. What sits on the shelf, in what order, next to what, does the teaching. The adult's job is curation, not correction.
  • Constraint beats abundance. Two colors and one tool, rotated on a plan, produce deeper exploration than twelve colors available every day. Scarcity, sequenced well, creates focus.
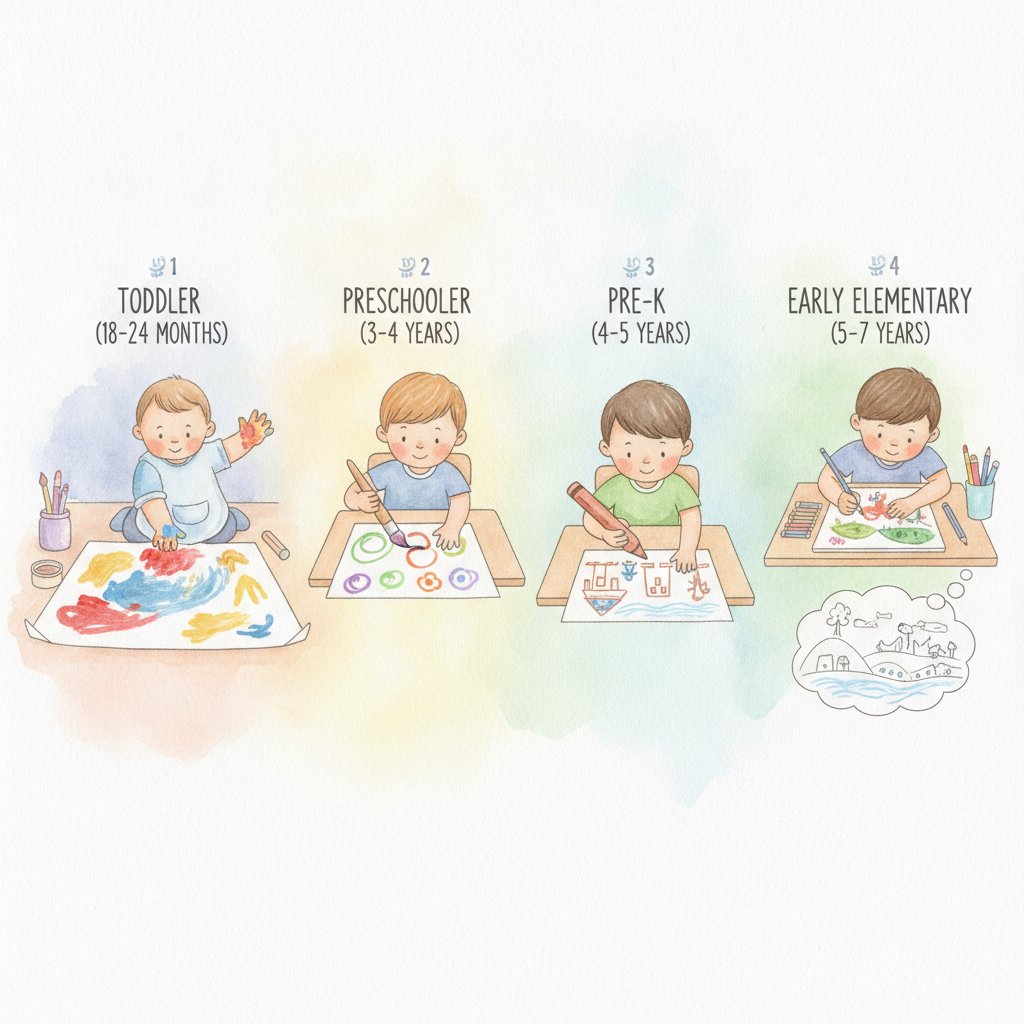
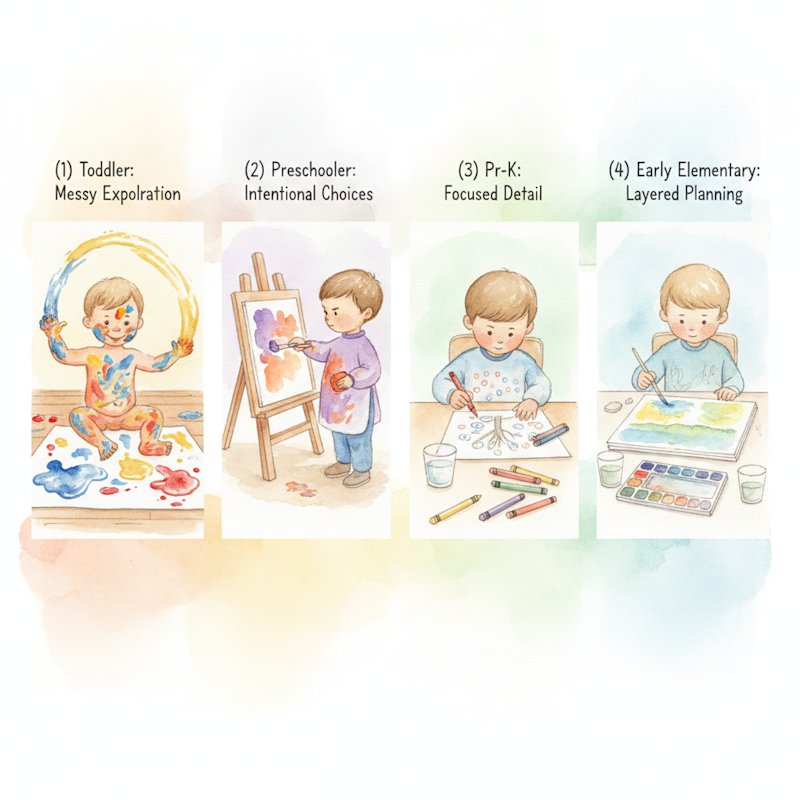
  • Skills build in a sequence. Large-muscle whole-arm painting comes before small-muscle detail work, the way crawling comes before walking. A curriculum respects that order; a craft bin ignores it.

The Developmental Spine: Why an Age-by-Age Progression Is the Architecture

Process art is developmental in exactly the way early writing is. You would not hand a two-year-old a pencil and ask for letters; you would give them large crayons and let them make marks. The same logic governs every art material, and it is the reason most process art "fails" in a classroom: the material is mismatched to the motor stage of the child — fine detail brushes given to children whose hands are not ready, or open-ended clay given to toddlers who need it pre-portioned.

The progression below is the spine of the curriculum. It tracks the developing hand, arm, and attention span, and it is the single most useful frame for deciding what to put out and when. The age bands are guides, not gates; a child moves up a stage when their motor control and attention show the signs, regardless of birthday.

Age-by-age developmental progression showing 4 stages: toddler whole-arm finger painting, preschooler wrist control with chunky brush, pre-K tripod grip crayon, early elementary layered technique planning

Stage 1 — Whole-arm and sensory (roughly 18 months to 3 years)

The art is the sensation. Finger paint, chunky brushes on large paper, dot markers, and clay used mostly for poking and tearing. The grip is a full-hand grasp; the strokes are large and from the shoulder. Process here is almost entirely tactile and kinesthetic — the "picture" is irrelevant. Expect sessions of ten to fifteen minutes and a lot of laundry. This maps onto the foundational fine-motor work described in our hand-strength guide.

Stage 2 — Wrist and forearm control (roughly 3 to 4 years)

The child begins to control the tool, not just the arm. Strokes become intentional, colors are chosen on purpose, and simple shapes (circles, lines) appear. Chunky crayons and stubby brushes earn their keep here, and a wall reference — like the colours poster pinned at child height — starts to give children language for what they are doing ("I used all the warm ones"). Attention stretches to fifteen to twenty minutes.

Stage 3 — Controlled grasp and early intention (roughly 4 to 5 years)

The tripod grip begins to emerge, detail work becomes possible, and the child draws with a goal, even if the goal is private. Scissors become usable with the right pair (see the progression in our scissor skills guide). This is the golden age of process art: children can sustain a piece over two sessions and will talk about what they are making. Sessions of twenty to thirty minutes are realistic.

Stage 4 — Planning and technique (roughly 5 to 7 years, early elementary)

Children plan before they make ("I'm going to draw a city, so I need gray and black first"). They handle smaller tools, layered techniques, and the idea that art can be revised. The curriculum introduces resist techniques, printmaking, and multi-step processes. This stage connects directly to early writing stamina — the same hand and attention that sustains a thirty-minute print also sustains a paragraph.

Read the spine as architecture, not a schedule. Every choice in the twelve-month plan below is justified by which stage it serves.

The 12-Month Scope & Sequence (A Full School-Year Curriculum)

This is the curriculum I now start every year with, and it is the heart of this guide. It is organized into four terms of roughly three months each, with one new material or technique introduced each week and three staples available permanently (chunky crayons, large paper, and a single washable paint). Each term has a focus, a skill target mapped to the developmental spine, and a consolidation week at the end. Run it for a year, then loop the same structure the following year with harder materials and older children — the architecture is reusable.

12-month scope and sequence showing one new material per week with three staples constant, organized into 4 seasonal terms

The constraint of one-new-thing-a-week is deliberate. It gives each week a focus, lets the returning staples consolidate prior learning, and produces the sustained-attention gains that are the whole point of sequencing.

Term 1 (Months 1–3): Mark-making and the medium of paint — Stage 1 into Stage 2

Skill target: full-arm movement gives way to wrist control; the child learns that a tool changes a mark.

  • Week 1 — One color, large brushes. Only blue tempera, large paper on the floor, one fat brush per child. The lesson is scale and full-arm movement. Resist adding colors.
  • Week 2 — Adding a second color. Blue and yellow. The discovery of green is the whole point of the week; let it happen without commentary.
  • Week 3 — Sponges and texture. Cut sponges into chunks. Same two colors plus white. The lesson is that tools change the mark.
  • Week 4 — Chunky crayons on small paper. Move from floor to table. Smaller paper demands the smaller wrist movements of Stage 2.
  • Week 5 — A third primary. Introduce red. Three primaries plus white is now the permanent paint palette for the term.
  • Week 6 — Dot markers on the wall. Vertical surface work builds shoulder and wrist stability differently than flat table work.
  • Week 7 — Clay, pre-portioned. Golf-ball-sized pieces only. Pre-portioning stops the "I need more" spiral and teaches economy.
  • Week 8 — Glue and found materials. Bottle caps, paper scraps, leaves from a nature walk. The fine motor skills work is hidden inside the picking-up-and-placing.
  • Week 9 — Cardboard construction. Strips of cardboard and tape. This is where planning begins — "I'm making a house for the dinosaur."
  • Weeks 10–12 — Consolidation. Free choice with all of Term 1's materials. Stand back, observe, and document. This is your first assessment window.

Term 2 (Months 4–6): Drawing tools and control — Stage 2 into Stage 3

Skill target: intentional color choice, emerging tripod grip, the child controls the tool rather than the arm.

  • Week 13 — Standard crayons. Move from chunky to standard, available alongside (not replacing) the chunky set.
  • Week 14 — Oil pastels. Brighter, more resistive; they demand more pressure and build hand strength.
  • Week 15 — Oil pastel over watercolor (resist). Children draw with pastel first, then wash diluted paint over it. The resist reveal is reliably the most-watched moment of the year.
  • Week 16 — Washable markers, four colors. The constraint of capping between colors builds the executive-function habit of sequence.
  • Week 17 — Wet-on-wet watercolor. Wet paper, diluted paint. Teaches cause-and-effect and control of a flowing medium.
  • Week 18 — Chalk pastels on dark paper. Reverses the light-on-light default; forces children to see value, not just color.
  • Week 19 — Charcoal (for the over-fours). Messy, expressive, erasable — introduces the idea that a mark can be revised.
  • Week 20 — Combined drawing media. Crayon, pastel, and marker at one station. Children begin combining deliberately.
  • Weeks 21–22 — Introduce scissors at the table. Match the pair to the stage (see the scissor skills progression).
  • Weeks 23–24 — Consolidation. Free choice across all drawing media. Second assessment window.

Term 3 (Months 7–9): Three dimensions, mixed media, and sequence — Stage 3

Skill target: the child sequences three or more materials and sustains work across sessions.

  • Week 25 — Clay with tools. Add rollers, wooden knives, stamps. The pre-portioning rule stays.
  • Week 26 — Paper weaving (large). Strips of two colors. Builds the patterning and sequence executive function.
  • Week 27 — Collage with a plan. Children choose three materials before starting, then commit. Plans the work before making it.
  • Week 28 — Junk modeling. Boxes, tubes, lids, tape. Multi-day projects become possible.
  • Week 29 — Natural materials. Sticks, stones, leaves, flowers. Tied to a nature walk; ephemeral art is welcome.
  • Week 30 — Wire and beads (over-fours). Fine-motor precision and pattern; a clear Stage 3 activity.
  • Week 31 — Sewing cards / lacing. Pre-writing fine-motor work in a different medium.
  • Week 32 — Recycled sculptures. Combines Term 3 skills into one sustained build.
  • Week 33 — Introduction to mono-printing. Paint on a tray, paper pressed on top, peeled back. Every print is a surprise.
  • Weeks 34–36 — Consolidation. Free choice across 2D and 3D. Third assessment window; children now sequence 3+ materials.

Term 4 (Months 10–12): Printmaking, technique, and portfolio — Stage 3 into Stage 4

Skill target: planned, multi-step, revisable work; the child talks about process using specific language.

  • Week 37 — Stamp printing with recycled shapes. Corrugated cardboard squares, corks, cut sponges glued to blocks. Repeats and patterns emerge.
  • Week 38 — Mono-printing variations. Multiple pulls from one plate; the "ghost print" teaches that one action yields many results.
  • Week 39 — Relief printing. Glue-line or foam-block prints for the older children. Multi-step: carve, ink, press.
  • Week 40 — Resist revisited (crayon + watercolor + salt). Adds texture to the Term 2 resist; three variables at once.
  • Week 41 — Mixed-media layering. Print, draw, collage on one piece across two sessions. Revision becomes explicit.
  • Week 42 — Collaborative mural. One large paper, all children, one rule (you may not paint over someone else's mark on purpose).
  • Week 43 — Portfolios. Children select three pieces from the year and dictate a caption for each.
  • Week 44 — Artist study (process, not product). One real artist (Bearden, Klee, Matisse) presented as a fellow explorer, not a model to copy.
  • Week 45 — Revisiting a Term 1 material. Hand the children the Week 1 blue tempera again; the contrast with their September work is the year's best assessment evidence.
  • Weeks 46–48 — Free choice and portfolio share. The year closes with children curating their own display and narrating their progression to families.

The architecture matters more than the exact materials. Four terms, one new thing a week, three staples constant, a consolidation window at the end of each term — that is the whole formula, and it loops indefinitely.

Give the art corner a shared language for color
A curriculum opens up the moment children can name what they are doing — 'I mixed orange into the blue and it went green.' A Colours Poster pinned at the child's eye level turns the corner from a place of mess into a place of noticing, and gives you the shared vocabulary for the assessment notes you will write all year. It is the single highest-leverage reference for a Stage 2 and Stage 3 art area.

Setting Up a Curriculum-Ready Art Center

A sustainable process art center setup with low shelf, transparent bins, smocks on hooks, drying line, and child selecting tray independently.

The number one reason teachers abandon a process art curriculum is cleanup. The number two reason is that materials degrade into chaos within a term. Both are setup problems, not philosophy problems. A sustainable art center is engineered, not aspired to, and the engineering is what lets the twelve-month plan actually run.

The physical setup. A low shelf the children can reach, with materials in identical transparent trays so the eye reads "options" rather than "clutter." One washable mat under the table you can wipe, not a tablecloth you peel. Smocks on hooks at child height so putting one on is part of the routine, not a negotiation. A drying line, not a drying pile — wet art flat on a counter is how art gets ruined and tables stained.

The materials list, by category. You do not need everything. You need one good example of each, chosen for the stage you are serving.

  • Paints: one washable tempera brand you trust (test it on your own clothes first), in the primary colors plus black and white. Mixing is the curriculum; pre-mixed sets short-circuit it.
  • Drawing: chunky crayons for under-fours, standard crayons and oil pastels for fours and up, washable markers with caps that click (audible caps teach the close-the-cap habit).
  • Paper: a roll of large paper for floor work, heavier than printer paper so paint does not buckle it, cut to size as needed.
  • Tools: two brush sizes (fat and medium), sponges, scissors that fit the hand, and glue in small refillable bottles so a spill is a spill, not a flood.

The rotation rule (this is what makes it a curriculum). One new material in each week per the scope and sequence, one prior material into a "returning favorites" bin. The shelf never has more than seven choices on it. The shelf is the lesson plan — what is on it this week is the curriculum.

The cleanup routine. Cleanup is a five-minute activity the children own, set to a song. Materials have homes labeled with a picture, not just a word, for the pre-readers. A child who knows where the brushes go will put them there; a child facing an undefined mess will walk away.

Turn a shape into a starting point, not an ending one
Around Stage 3, children begin to draw with intention, and a shape reference gives them somewhere to begin without telling them where to end. A set of Shapes Flashcards in the art corner works as a provocation — a child picks a card, and instead of 'draw this,' the prompt becomes 'what could this become?' That single reframe is the difference between a product and a process, and it fits neatly into the Term 2 drawing-and-control focus.

Assessment: A Curriculum Needs a Documentation Frame

The fear with process art is that it is unmeasurable, which is only true if you measure the wrong thing. You do not assess the painting; you assess the process. Over a year, a process art curriculum produces four observable, trackable things — and they map cleanly onto early-childhood developmental and learning standards, which is what makes the documentation defensible at parent-conference time.

  • Sustained attention. How long does the child stay with a self-chosen piece before moving on? Track the average per child across each term. The progression from four minutes to fourteen is the most reliable fine-motor and executive-function signal in the room, and it is free to measure.
  • Tool control (stage). Does the child hold the brush in a full fist (Stage 1), with the wrist leading (Stage 2), or with emerging finger control (Stage 3)? Note the stage, not a grade. The progression across terms matters more than the current point.
  • Material exploration. Does the child use one material repeatedly, combine two, or sequence three or more? The move from single-material to sequenced-material use is the cognitive leap of the Stage 3-to-4 transition, and it shows up clearly between Terms 2 and 3.
  • Language about the work. Can the child tell you what they did and why? A child who says "I put the dark one on first so the light one would show up" is operating at a different level than one who says "I painted." Both are fine; the second is information about what to offer next.

Keep a one-line note per child per week, on a simple grid. That is the whole assessment system. A rubric with fine-motor, attention, exploration, and language as the four columns, dated by term, turns a year of "mess" into a documented developmental record. NAEYC's guidance on developmentally appropriate assessment is clear that such observation-based, process-oriented documentation — rather than product evaluation — is the appropriate way to assess young children's learning, and it is exactly the evidence that makes parent conversations easy and reporting defensible.

The "it looks like nothing" parent conversation

This is the conversation process art programs live or die by, and the script is short. When a parent asks why their child's folder is full of brown paintings: "Your child spent thirty minutes this week learning that adding white makes a color lighter, and that mixing all three primaries makes brown. That is the same experimentation a chemist does. The painting is the record of the experiment, not the point of it." Then show them the one-line note. Parents who see the documentation stop asking for the cotton-ball snowman.

Make color mixing an activity, not an accident
The 'I made green!' moment is where color theory stops being vocabulary and starts being experience — and it happens over and over across the 12-month plan. A set of Color Flashcards in the art corner gives younger children (Stage 1 and 2) a way to predict before they mix and narrate after, which is exactly the science-process skill the curriculum is quietly building. Pull a card, make a prediction, mix, and check.

Inclusion: Building the Curriculum for Every Child

A process art curriculum that works for most children will still miss some, and the children it tends to miss are the ones with sensory processing differences — the child who cannot tolerate wet paint on their hands, or the one for whom the art corner is overstimulating. Adaptations are not a separate program; they are choices built into the same shelf and the same scope and sequence. This is consistent with NAEYC's position that developmentally appropriate practice requires responsiveness to individual children's needs, not a one-size-fits-all plan.

A watercolor illustration of a child exploring a colorful sensory bin with both hands

For the sensory avoider, the child who recoils from wet or sticky: offer tools that create distance. Long-handled brushes, paint in sealable bags taped to the table (the child pushes the paint around from outside the bag), and dry materials like chalk and crayon as the primary medium. Never force hand contact; the stress cancels the developmental benefit, and the same Term 1 skill targets are reachable through the adapted tools.

For the sensory seeker, the child who needs more input: lean into it safely. Larger paper, thicker paint, clay with added texture (rice, sand), and longer sessions. A seeker who is under-stimulated by a thin wash of paint will behave disruptively; the same child given dense, textured material will focus for thirty minutes.

For the overstimulated child, regardless of seeking or avoiding: a calm corner near but not in the art area, with a single quiet option (drawing, coloring), and permission to leave the table without a fuss. The rule that matters is that leaving is allowed — a child trapped at a wet table is a child who learns to hate art. Our calming strategies guide covers the wider self-regulation toolkit this fits into.

Handling Resistance and Displaying the Work

The child who says they hate art

Every class has at least one child who announces, firmly, "I'm not doing art." Treated as defiance, this becomes a battle. Treated as data, it is the most useful sentence the child will say all year. The commonest cause is a confidence injury from a product-art experience — a well-meaning adult "fixed" their drawing, or their work was compared to a peer's, and the child concluded that art is a test they fail. The fix is not to insist they participate; it is to remove the test. Offer a non-art entry: a child who refuses to paint will often sort the crayons by color, arrange the brushes, or cut paper into strips — all fine motor work and all, quietly, art-adjacent. Once the pressure is off, most dissenters migrate to the table within two weeks. The second cause is genuine under-stimulation — the materials are below the child's stage. Match the material to the child using the developmental spine, not the child to the material.

Displaying process art without undermining it

A watercolor illustration of cheerful preschoolers at a classroom art gallery opening, showing their own paintings

How you display process art silently tells children what their work is for. Display only the "prettiest" pieces and you have recreated a product-art hierarchy. Display nothing and you signal the work does not matter. The middle path — the one that reinforces the curriculum — is to display process. A rotating wall where every child is represented by their most recent piece, changed weekly, with a small caption written by or dictated from the child ("Leo: 'I mixed until it was storm color'"). The caption does the teaching. A parent reading the wall sees not a gallery of talent but a documentation board of a year of developmental progression — which is exactly what it is. This kind of display also fits naturally into the wider classroom decor plan without competing with it.

One rule that prevents most display problems: never write a child's age-stage assessment on the wall. Documentation is for the teacher's folder and the private parent conversation; the wall is for the child's pride.

Frequently Asked Questions

What is a process art curriculum, and how is it different from a list of activities? A curriculum is a sequenced plan: materials, skills, and order are chosen to match developmental stages and build deliberately across a year, with a curated environment and a documentation frame. An activity list is a folder of things to do. The process art activities for preschoolers hub is the activity bank; this guide is the curriculum that sequences them.

What is the difference between process art and product art? Process art values the making; the child chooses materials and outcome. Product (craft) art values a finished result the child was guided toward. Both have a place, but most early-childhood rooms are over-indexed on product art, which is why a deliberate process art curriculum is the corrective.

How young can I start the curriculum? From around eighteen months, with Stage 1 materials — chunky crayons, finger paint, pre-portioned clay. The Stage 1 work is sensory and whole-arm; expect short sessions and supervise everything that goes in a mouth.

How do I assess a process art curriculum for early-childhood reporting? Assess the process, not the product: sustained attention, tool-control stage, material exploration level, and language about the work. A weekly one-line note per child on a four-column grid, dated by term, is a complete, defensible system aligned with NAEYC's guidance on observation-based assessment.

Can I run this with a mixed-age group? Yes — that is exactly what the developmental spine is for. Place each child at their stage and offer the matching materials; the scope and sequence runs in parallel across the ages in the same room.

How much should a year of process art cost? Far less than most programs spend. One trusted washable paint brand in primaries plus black and white, chunky and standard crayons, oil pastels, a roll of heavy paper, and a small set of good tools outperforms a hundred-dollar kit of pre-packaged "art centers." Constraint, sequenced well, is the curriculum.

Building a Year of Process Art

Process art is not an activity you add to a Friday afternoon; it is a curriculum that builds a year of fine-motor, cognitive, and creative development when you sequence it like one. Start with the developmental spine, run the twelve-month scope and sequence with one new material a week and three constant staples, set up the shelf so cleanup belongs to the children, and keep a weekly one-line note that turns the mess into a documented record. From there, loop the curriculum the following year with harder materials and watch the sustained-attention numbers climb term over term.

The art that comes out of a process art curriculum is not always photogenic, but the children who make it are measurably more confident with a tool, more willing to take a creative risk, and more able to talk about their own thinking — which is the actual goal. For the individual activities that fill this curriculum, see the process art activities for preschoolers hub; for the wider early-childhood practice it sits inside, explore the fine-motor foundation in our hand-strength guide, the scissor skills progression, and the full library of classroom articles.